While I’ve always been excited by Flash development, I recently found myself using those skills only for creating back-up video players for client projects here at Cartelle. Needing a creative challenge, I decided to take the plunge into WebGL, as well as javascript beyond jQuery plugins. This is my first experience with the technology, leaving what I’m sure will be plenty of room for improvement. Like other WebGL projects, DeathPaint leverages the wonderful Three.js. Below, I'll highlight the more important challenges we faced during development.
The first and most obvious challenge was how to achieve basic painting in 3d space. After researching a few solutions such as reverse UV mapping, I came to the conclusion that color picking was the most efficient and accurate solution. In order to do this, you start with creating not one, but two textures prepared for the model:
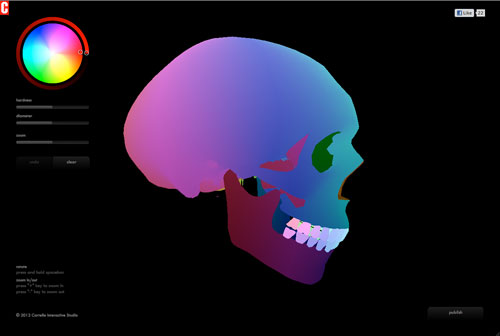
This is the visible texture that the user sees. This is also the texture that the user will be painting on.
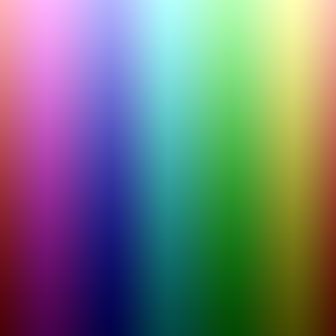
A color texture is an image filled with unique pixels. When this color texture is wrapped around the model, you essentially have a unique color on each pixel in 3d space. Below is the color texture in action. It's rendered invisibly in a separate render target and its only use is to associate the user's mouse point with a unique color. When the application first loads, each pixel in the color texture is first stored in an object/hash so we can quickly associate a color with its position index on the texture (colorData[RGB] = positionIndex).
Getting from the user's mouse point to a 2d point on a texture looks something like this…
// get your context
var ctx = renderer.getContext("experimental-webgl");

//first assign the color texture to the model where colorTextureMaterial
//is just a MeshBasicMaterial with the color texture as its map
mesh.material = colorTextureMaterial;

//render to a separate render target where renderTarget
//is defined as an instance of THREE.WebGLRenderTarget
renderer.render( scene, camera, renderTarget );

//grab the color value
var arr = new Uint8Array( 4 );
ctx.readPixels(mousePoint.x, mousePoint.y, 1, 1, ctx.RGBA, ctx.UNSIGNED_BYTE, arr);
var id = arr[0]+":"+arr[1]+":"+arr[2];

//get the texture position where all of the unique
//colors are stored in an object like colorData[RGB] = positionIndex;
var texturePositionY = Math.floor(colorData[id] / textureHeight);
var texturePositionX = colorData[id] -  texturePositionY * textureWidth;

//put the visible texture material on
mesh.material = visibleTextureMaterial;

//draw to the visible texture material however you'd like
var ctx = mesh.material.map.image.getContext('2d');
ctx.beginPath();
//draw using your texturePosition coordinates
ctx.closePath();

//render the visible scene
renderer.render( scene, camera);
As you can see above, two separate render cycles are performed at the frame rate, one to the render target with the color material and the final with the visible texture that the user sees. Remember to set needsUpdate = true on your textures.
I still have remaining issues with this method because it simply does not have the level of accuracy as you would have with a 2d painter. Here are a few things I attribute that to:
Stretching: There is always some degree of stretching when wrapping the model with the color texture, leaving colors not entirely unique. This is most present when using the smallest brush size, perhaps even more so since we used a more spherically shaped model.
Color Accuracy: After many tweaks, I still had issues with specific RGB color values being slightly different after being wrapped on the model. Even after trying to apply filters to simplify the palette, it still didn't do the trick. I also tried color textures created with code, etc. But the color texture seen above gave me the best result.
The second major challenge was the model and its UV map. The project started with a free 3d model of a skull that had a relatively fragmented UV map. While this is fine for basic testing, it didn't take long for me to realize that this creates way too many seams in the experience. With the help of a 3D expert, we soon were able to simplify the map by using spherical mapping as well as a few other tweaks here and there.
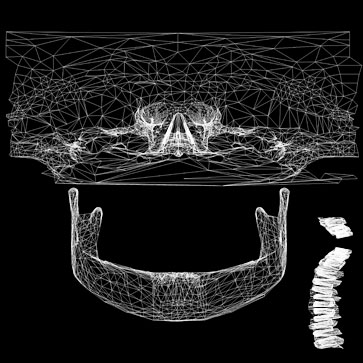
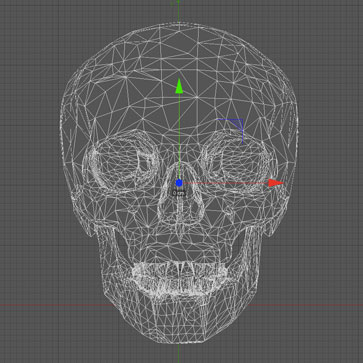
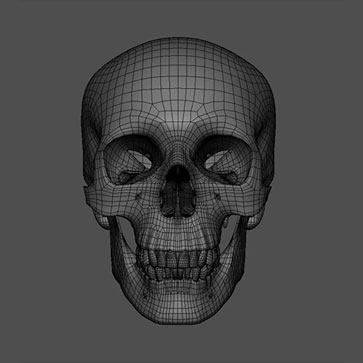
This fixed quite a few problems with seams. But we still had a few remaining issues. Below and to the left is the first model we used. The triangles that were present in the UV map weren't very uniform, which caused for brush sizes to vary drastically across the model. The forehead would appear scaled and blown out, while painting on the jaw would appear quite small. To the right is the new model we ended up using. It was much more uniform and the scaling was minimized, so the brush size is fairly similar throughout the skull.
We also broke out a few pieces of the skull, such as the eye sockets so they wouldn't stretch as drastically. Initially, we experienced quite a bit of "double painting". This occurred when parts of the texture were reused across the model, causing painting in one area to appear in another area as well. We solved this by altering the map or breaking the area out as a separate entity in the map (alleviating the double painting, but creating a small seam.) We still have some minor double painting appearing around the sides of the head that we are looking into correcting.
View the final result here.
Hopefully this was helpful to developers interested in in-browser texture painting. These applications could reach far beyond basic entertainment value, and I’m looking forward to seeing where it goes.
Johnny Slack is the co-founder and lead creative technologist at Cartelle Interactive Studio in Amsterdam.
He can be contacted on twitter @cartelle. For more information on his work, please visit cartelle.nl.